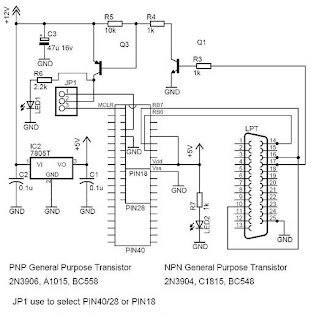
This is my first DIY PICkit 2 clone. This simplified circuit from the original PICkit 2 circuit only support for 5v PICs.
Schematic
You can download the firmware from this link:
Program the firmware to your PIC18F2550:You can use free PIC programmer available on website to program your PIC18F2550. I use winpic800 version 3.61 and the programmer hardware art2003. Art2003 is a simple circuit and easy to make. The original art2003 designed to program PIC18F2550 on LVP ( Low-Voltage Programming ) mode. Which mean, LVP configuration bit must be enabled first. The new PICs have enabled LVP bit by factory settings. It's no problem for you to use the original art2003 to program the new PIC. You just need to enable the LVP bit every time you program your PIC to make sure that you can use the art2003 to reprogram your PIC on the future. Once, the LVP has been disabled, the PIC not working on art2003 anymore and you need to reprogram or enabling LVP bit by using High Voltage Programming mode. The disadvantage of enabled LVP bit is, the RB5 pin no longer can be use as an Input/Output pin. The RB5 must be pulled down to avoid the PIC entering LVP mode during running the PIC program. The problem here is, the PICkit 2 use the RB5 pin as an input pin, so, disabling LVP bit for the PIC18F2550 is needed.
Since, the art2003 just support for LVP mode. I modify the circuit so that it can support the High Voltage Programming. You also can use others hardware like JDM programmer or Propic2 to program the PICkit 2 firmware to your PIC18F2550 by using the winpic800.
Modified Art2003 SchematicPicture below show the hardware setting for the modified art2003 and screenshot of successful program my PIC18F2550

I edit the original firmware hexcode to get my own ID for my PICkit 2. You can see it on the pictures below


